Friday, 22 November 2013

An urge for sequins.


So I didn’t finish Hector’s jumper. 


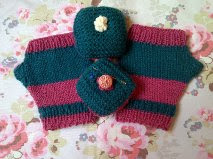
Trying to decrease for the raglan arms and keep the pattern going has tested my brain capacity, slowing the progress right down. But I’m really pleased with how it looks. Luckily the sizing is 6-12 months so I’ve got time, but it is looking rather small. This a picture of the back. I'm just hoping this is correct, as it is really stretchy. Fingers crossed.


Some projects have been completed though. It was my friend Louisa’s baby shower last weekend and as we both love the Purl Bee website I wanted to knit her something from that. I chose this little mushroom rattle. They are so sweet and it’s one of those pieces you want to make lots of.

Alison and Kate from my evening class.
I’ve also been busy teaching my ‘learn to knit’ class over the past few weeks. It’s been fantastic seeing the progress that the ladies have made and I have a nice mix of people who haven’t knitted before and others who need their knitting memory jogged. Alison went away and stormed ahead with my mitten pattern and pin cushion. And has already moved on to hats.


Alison's mittens and pin cushions

I thought I’d better have a little Christmas project on stand-by for the classes, and found these great birds in an old knitting magazine. I changed the pattern a little to make it a single bird. I haven’t used it in a class yet but I think they may end up as little Christmas presents. This time of year brings out an unquenchable urge for sequins and glitter.

Hanging birds by Tracey Todhunter from 'Knitting magazine', Autumn 2012

Happy Knitting! 

Sunday, 3 November 2013

Back to Business.


I’m taking small steps but I’m back working after having Hector – both with my jewellery and my knitting classes.


I was back teaching knitting last week at the lovely Carolyn Rose School of Sewing. Two lovely ladies came to my 'learn to knit' class and we had a great time. It was more a case of bringing back forgotten skills than starting from scratch. One lady had a go at my mittens from my last blog. The other wanted to see if it would help with her RSI. We left undecided but we’re going to try again in a couple of weeks.

I love teaching and I get so much from it myself, whether it’s uncovering great patterns or devising them myself, and not to mention meeting some lovely people. There aren't many situations in my life where I sit with strangers and talk solidly for 2 to 3 hours, covering everything from our childhoods to politics, with a little knit/purl and ‘look how tiny my zebra is’.


I knitted some little swatches of basic stitches for last week's class.  Well I started with basics and then carried on creating some swatches for myself of stitches I’ve wanted to try.


Star Stitch

Basketweave cable

Dew drops.
I haven't got this quite correct yet.

  In doing this I realised how unadventurous I am with my textures; I tend to focus on the colour and patterns. So I’ve set myself a project of knitting Hector a little jumper and its main feature is its stitch.

It’s this really cute Bell Rib Sweater by Vibe Ulrik Sondergaard from her Book, Lullaby Knits. But I got the pattern from November's Knitting Magazine.


I can’t say the pattern is coming naturally to my fingers like some do. It’s dead easy really; I think I should blame my brain rather than my fingers. I just started last night. I’ll post the finished article hopefully next week.


Happy Knitting!

Saturday, 19 October 2013

For your chilly handed friends.


The problem with starting a knitting blog at this time of year is that some of the things I'm knitting I have to keep secret, or there wont be any christmas surprises.  I'm sure there are a few of my family and friends that may think there isn't a lot more I could knit for them, but thats where they would be wrong. From bookmarks to slippers, scarves to doorstops, there is always something. So I thought I would share my super easy Fingerless mittens pattern, they are a perfect christmas gift, and knit up so quick there is time to make lots of pairs for all of your chilly handed friends. 


I've used this really cosy Drops, Eskimo Tweed yarn which I bought in the summer and have been really looking forward to using, it's one of those wools that you can't stop holding it's so soft. It's quite chunky and using it with 4mm needles creates a really warm and dense fabric. 

I have knitted this exact same pattern with an 8 ply - Double knit yarn and a 10 ply - worsted weight yarn and it worked just as well.


You will need:
2 50g Skeins of Drops, Eskimo Tweed.
1 pair of 4mm needles
1 stitch marker / 1 wool or darning needle /  a set of pins


Method:

Cast on 38 stitches

We start by knitting a Rib stitch. This give a great stretchy edge that doesn’t curl up.
Row 1 to Row 10 - K1, P1; repeat these two stitches to the end of 
the row.

Knit Stocking stitch
Row 11- K all stitches
Row 12- P all stitches
Repeat these 2 rows for Rows 13- Row 16; the last row will be purled,

Increasing the number of stitches

I have put a picture tutorial of knitting a stitch Front and back  (K1 FB) at the bottom of the pattern.

Row 17 - K3, K1 FB, knit all stitches to the last 4, K1 FB,  K3
Row 18 - P all stitches
Row 19 - K4, K1 FB, knit all stitches to the last 5, K1 FB, K4
Row 20 - P all stitches
Row 21 - K all stitches
Row 22 - P all stitches
 
Making the Thumb
Row 23 -  Cast on 2 stitches.  Work these two new stitches as follows - K1, K1 FB, Place marker  K to  the end of the row.
Row 24 - P all stitches
Row 25  - K1, K1 FB, K1,   Knit to the end of row
Row 26 - P all stitches
Row 27 - K1, K1 FB, K1 FB, K1, Knit to the end of the row
Row 28 -  P all stitches
Row 29 - K1, K1 FB, K1, K1 FB, K1, K1 FB, Knit to the end of the row
Row 30 - P all stitches
Row 31 - K1, K1 FB, K1, K1 FB, K1, K1 FB, K1, K1 FB, K1, Knit to the end of the row. There should be 13 stitches in front of the marker.
Row 32 - P all stitches
Row 33 - cast off 13 stitches and remove the marker. Knit to the end of the row.
Row 34 - 38 continue in stocking stitch


You have created this little fan shape for the thumb.


Finish with Rib
Row 39 to Row 43 - K1, P1, repeat these two stitches to the end of the row.
Cast off all stitches leaving a long tail.

Creating the seam:

It’s a good idea to pin the seam so you leave enough room for the thumb hole.

With the long tail from casting off, sew up the mitten with a darning needle 

Tie in all loose ends

You’re Done!!


Knitting a stitch Front and back (K1 FB) 
This is an easy way to increase stitches without creating holes in the fabric.

Knit the stitch as usual 

 Do not remove the stitch off the left needle. 

knit into the back of the same stitch. 

You can now remove the stitch from the left needle. 

If you do have a go at these mittens it would be great if you could share it on my Ravelry pattern page: http://www.ravelry.com/patterns/library/supper-easy-fingerless-mittens

Happy Knitting!

Sunday, 13 October 2013

War-time knits and Innocent hats.


It’s been more a week of discovery than actual knitting, but just as much fun nonetheless. I stumbled across a collection of old war time knitting patterns this week that I had been given a few years ago by my friend Nicky and I’ve had a great time looking through them again and uncovering some great pattern ideas and some insightful articles about the war-time woman.
 
 These ideas for Christmas patterns could be in a knitting magazine now.

I just thought this was a beautiful and classic picture. 


There was a series on the BBC recently called ‘The Fabric of Britain’ which looked at the history of British knitting and touched on the importance of it during the war. Not only providing supplies of socks and scarves to the troops but also having the ability to create new clothing from worn out pieces, which is why the fashion for shorter cardigans and tighter jumpers took off through the war as there was simply less wool as you recycled an old jumper again and again.


I love these children’s patterns. I’d like to try converting this girl's cardigan up to my size purely for the shoulders, I've been trying to find a modern pattern like this for a while now.


They obviously didn’t scare easily back in the 40’s, as some of the children are terrifying.


This fringe article was on the back of a knitting pattern from 1943 titled “Even in War-time you’ll long for a new hat when thinking of spring”.


I Just like picturing this woman steaming her brown bread, wearing her fur collar and sipping a Martini.

After removing my fur collar and putting down my Martini I did manage to do a little knitting myself this week.


I thought I would try my hand at knitting some hats for the ‘Innocent big knit’. You may have seen the adverts on TV. They put the hats on the little bottles of smoothies and money from the sales goes to keeping older people warm this winter. They are really fun to make and there are patterns to follow on their website http://thebigknit.co.uk/join-in. You maybe able to tell that I came up with the rabbit hat as I went along, Which is all part of the fun of it. I just hope someone will take pity on his terrified little face.


And of course we just couldn’t resist this.

Happy knitting!


Sunday, 6 October 2013

My first offering.


Having finally got my initial post out there I’m so excited to actually start sharing my patterns.


Last week I posted a picture of my black Tassel Cowl. I came up with it just for myself at first and I
then took it along to my Learn to Knit class as a way to introduce texture. It’s a great quick knit for a rainy weekend. It’s also knitted flat, then seamed. So if you want to knit a cowl but haven’t got to grips with working in the round, this is just the ticket. To make it even more convenient, this week I’ve been adapting the original pattern so that it just uses one ball of wool. You could use any Chunky yarn; as a guide this particular wool is 167 yards/ 152 meters to 100g.


You’ll need:
1 ball of King Cole, Big value chunky, Black.
1 set of 6mm needles
wool/darning needle for seaming.

Tassels - It’s a good idea to make these first.

You need to make 14 tassels.

Method:
Cut 14 strands of wool 6.5 inches long to tie the tassel through the top and onto the cowl.

Cut 14 strands of wool 5.5 inches long to bind the top of tassel.

Stage 1 - For each tassel wrap the wool loosely 8 times around a card such as a bankcard.
Stage 2 - Tie your 6.5” strand under the wool at the top and tie tightly.
Stage 3 – Remove the tassel from the card and bind close to the top with the 5.5” strand.
Stage 4 - Cut through the loops at the bottom to create your tassel.

When you have 14, set them aside till later.

Cowl:
Cast on 90st

You can use whatever cast on method you are confident with. I have started using what’s called ‘Long tail’ or ‘Double cast on’; it’s really stretchy, neat and once you have the technique it’s really quick. There are loads of good videos on this – my favourite is this one: http://www.knittinghelp.com/video/play/long-tail-cast-on


The cowl is knitted in English Moss stitch It is really simple, really cosy and doesn’t make the piece curl like some stitches do. Just remember, it’s worked over an even number of stitches.

Row 1 – Knit 1, Purl 1  repeat these 2 st to the end of row.
Row 2 – Purl 1, Knit 1  repeat these 2 st to the end of row.

Repeat these 2 Rows for approx 48 rows or until you have the desired size, leaving enough to cast off and seam ( I Left approx 36” ). 

Bind off all stitches.

Lay the piece flat and evenly space the tassels along the bind-off edge. Remember, the ends meet so only put a tassel at one corner.

You can now start tying the tassels in place, and threading the ends back into the tassel.


When they are all in place, fold the two sides into the middle of the piece and seam up.
Feel free to seam up with what method you are confident with.
If you haven’t used ‘Mattress stitch’ before it’s worth looking it up so the seam is invisible.

Sew in all the loose ends and it's done!


You can also find the pattern at http://www.ravelry.com/designers/rosie-bill and add pictures of your finished cowl. I’d love to see what variations you come up with.


I made this cowl as a variation for absolute beginners. It's the same method of cast on, with 90st but it's knitted in Garter stitch and I thought the blue would go better with these Pompoms. 
I’d love to see what variations you come up with.


Happy knitting.


Saturday, 28 September 2013

Where to Begin.


Welcome to my first knitting blog. To put it simply I love, love, love hand knitting. I find it completely addictive, especially at this time of year when the nights are beginning to draw in and you find your self making a serious commitment to knitting. For those of you who haven’t made the leap yet, you’ll find your mind is a whirl with patterns, yarns, YouTube videos of stitch techniques and a yearning to make anything that feels cosy and comforting.


My Tassled Cowl

The big question is where do I even begin to start? The most sensible thing to do would be to finish off all the on-going projects that are overflowing from my knitting basket, not to mention finishing the jumper that my Mum asked me to knit in August 2012 (might have even been 2011). Last month I ventured into the attic and organised my wool stash, all though leaving me with a tremendous sense of achievement, as with a 2 month old baby it was the only thing I had managed to achieve in the flat for a while (my priorities may be the next in line to organise).


The reason my projects don't get finished.


This just served to further my ever consuming habit, bringing back all those good intensions for 'this' ball of yarn and why I spent £15 on 'that' ball of yarn when there is only enough to make one sleeve. And of course for a knitter it’s not too soon to start thinking about mass production of Christmas presents. 

These were a few of last years christmas chickens (Pattern by Jacqui Turner)

I feel exhausted just putting all this into words. So I thought I would start this blog to at least unclutter my head but also to share some of my own patterns, projects and knitting tips.

Happy Knitting
Rosie x